Read the other parts of “Yocto and WSL” series:
Yocto and WSL, part 2: The Graphic Boogaloo
Yocto and WSL, part 3: WSL vs. VMWare
(Sorry for the clickbaity title, but the WordPress Headline Analyzer gave it the best score I’ve ever seen so I can’t change it)
Let’s begin this post with the basics. What are these words and acronyms in the title? Some nerd stuff? Well, yes. Yocto is a project/tool that can be used to generate a cross-compilation toolchain and a firmware image for an embedded system. This sort of work includes never-ending woes with bootloaders, Linux, and much, MUCH more. Windows Subsystem for Linux (= WSL) is “a compatibility layer for running Linux inside Windows”. It’s not really a virtual machine (at least according to Microsoft) or a container, despite running a virtual machine and virtualization being its core (or so I understood). What is it then exactly?

Well, let’s call it a virtualization layer and settle for a fact that it’s a way of running a Linux-like environment inside Windows with relative ease. And as you can guess from the Yocto project’s description, we’re going to be needing plenty of that Linux.
First things first: setting up WSL2. There are plenty of tutorials and official documentation on this topic, so I’m not going too much in-depth with this one (although I’ll go through the issues I faced along the way). I recommend checking at least this official documentation out (There actually seems to be an easier way of installing WSL these days, but I haven’t tried it). In a nutshell, the steps that should be done are:
- Enable WSL feature in Windows (and reboot)
- Install WSL2 kernel update (most likely reboot after this one won’t hurt either)
- Set WSL2 as the default WSL version (reboot isn’t really needed here, but it’s always fun to stare at that picture of a cave that’s the log-in screen background and think how you could be somewhere else. Somewhere warmer where the sun shines)
- Install the desired distribution.
It’s Ubuntu that you desire. Or at least I recommend it because it’s the most widely supported Linux distro [citation needed] and the Yocto guide explains the steps a bit more specifically for Ubuntu users. Other distros still work, or at least should work. Yocto claims to support “recent releases of Fedora, openSUSE, CentOS, Debian, or Ubuntu”, whatever that means.
However, this installation phase was where I started to face problems. When installing Ubuntu I got the following error:
Installing, this may take a few minutes…
WslRegisterDistribution failed with error: 0x80004005
Error: 0x80004005 Unspecified error
Despite the ominous-sounding “Unspecified error” this was caused by the simple fact that I didn’t have enough disk space on the disk that contained AppData-folder (I guess this defaults to C:). There seem to be some other explanations for this error on the Internet, but I recommend freeing space if you’ve filled your C: with junk (as I assume every Windows user has done). 2GB of free space wasn’t enough, 7GB seemed to do the trick.
After doing this and retrying, I got the following error instead:
WslRegisterDistribution failed with error: 0xc03a001a
Error: 0xc03a001a The requested operation could not be completed due to a virtual disk system limitation. Virtual hard disk files must be uncompressed and unencrypted and must not be sparse.
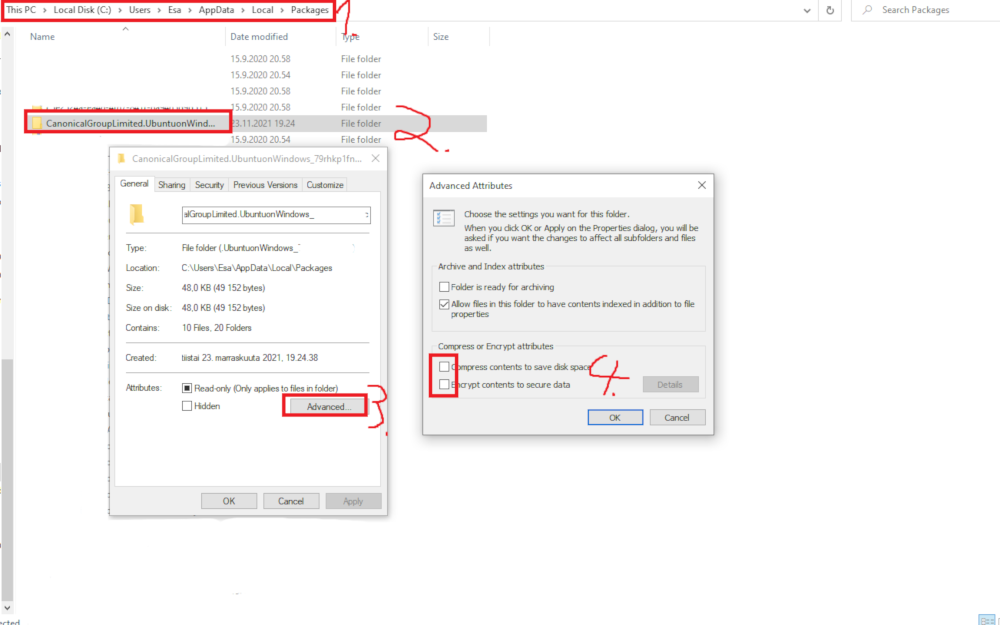
This one was a bit trickier, but I found the fix here. Basically, you need to navigate to %LOCALAPPDATA%/packages/, check the (advanced) properties of CanonicalGroupLimited.UbuntuonWindows-folder and ensure that it isn’t compressed or encrypted.
And after these trials, the Ubuntu image should finally install without further problems. Or at least it did for me, YMMV. Once you get the WSL up and running, I recommend playing around with it a bit if it’s not familiar to you yet. If you don’t know where to start, this video can be useful (About 3:40 onwards). To be honest, so far the biggest issue I’ve had with WSL is how simple it is, I was expecting it to be a lot more complex and cumbersome.
After getting the basics of WSL down it’s time to get started with Yocto. Well, almost. As you may guess, the Yocto project takes up disk space. A lot it. The official requirement at the time of writing is 50GB. However, as you may remember from the earlier chapters, I have barely 7GB free on the disk where the WSL image gets installed by default.
A bit of googling revealed two useful options to the Windows’ WSL command-line tool: export and import. These can be used to pack the image and then load it in a non-default location. unlink option could be used to get rid of the obsolete machine. So in short, the Powershell commands to be run on Windows are:
wsl --export Ubuntu E:\yoctotest\testDistro.tar
wsl --unlink Ubuntu
wsl --import UbuntuCustom E:\yoctotest\UbuntuCustom E:\yoctotest\testDistro.tar
#Or something similar, depends a bit on what you actually want and what drives you have
As you may have noticed at this point, all of my problems were caused by the lack of disk space on C: drive, so if you don’t have that problem I guess your experience will be a lot smoother.

Finally, after getting the WSL image ready and in the correct location, it is time to properly start working on the Linux side of things. There’s one more thing to do before moving to Yocto: updating apt and installing zstd. I’m not sure why zstd isn’t listed in Yocto requirements, but my build failed without it. These commands can be run in the Ubuntu shell to get the things ready for Yocto:
sudo apt update
sudo apt install zstd
After that, it’s mostly just a matter of following the Yocto quick start, with the difference of building the core-image-minimal instead of core-image-sato. Sato-image is the GUI-image, but we don’t have graphics yet so it’s better to stick to core-image-minimal. In a nutshell, the steps for Yocto-build are:
- Install dependencies (no need to reboot)
- Clone poky-repository and check out the latest LTS (=long-term support) branch
dunfell(interestingly, no reboot) - Source the build environment (don’t reboot, you’ll lose the sourced environment)
- Build the
core-image-minimal. Did I mentioncore-image-minimalyet?
Yocto-build with WSL will print a warning that you better be sure that you have enough disk space, but besides that it should work normally. With the default settings, the build will eat pretty much all of the resources your machine has (it’s been optimized that way), so don’t be afraid if things start to freeze a bit. Especially memory tends to be a bottleneck, partially because of WSL. However, I was able to watch a Youtube video most of the time while waiting for the thing to finish, so I guess it doesn’t render the computer completely useless. During the processing of the heavier components it may be better to do something with a video game console of your choice though.

And if the stars are aligned, the build will complete in an hour or two (or six)! The dunfell-branch is usually quite stable (as LTS branches should be), so the build shouldn’t be in a broken state. After the compilation is done, you can try out the generated image with the following command:
runqemu -nographicrunqemu command is Yocto’s wrapper for QEMU, which is an emulator that can be used to run the built images (and plenty of other things outside Yocto as well). runqemu helps to automatically find and set up the image for the emulator. -nographic option prevents loading a graphical shell in a separate window, as the graphics are not set up for WSL yet.
And that’s it! It is easy once you know how to do it. Like pretty much everything else I guess. But I was pleasantly surprised that Yocto officially supports building in WSL, so there was no need for (dirty) hacks. The memory seems to be a bit of a problem, but that’s always the case. In the next post there’ll hopefully be some graphics!
