
If you’re like me, you have more money than brains and not too much of either really. This can lead to situations where you end up buying a MacBook without actually checking if it supports Yocto builds, the one thing you inexplicably like to waste your little free time on. As it turns out after getting the nearly 2K€ laptop, builds on Mac are not supported. But don’t worry, where there is a problem, there usually is a convoluted solution.

As one might expect, the answer is virtualization. Specifically Docker virtualization this time. Writing this kind of instructional text is becoming my second nature, earlier I wrote how to build Yocto on Windows/WSL, and now how to build the thing on Mac. One day I’ll get an actual Linux computer suitable for this kind of development work, but not today. I’m out of money at the moment. Anyways, to the actual guide. I’ll warn you beforehand that my knowledge of Docker is quite superficial, but I’ll try to explain things as well as I can.
Installing Docker
When doing Docker builds the first step obviously is to install Docker. Get it from here and come back when you’re done.

Getting Correct Images
Now, the actual tricky part: getting the Docker images suitable for building Yocto. Docker images are used to create the containers that are the virtualized environment we can do the builds in. Yocto Development Tasks Manual mentions CROPS (CROss PlatformS) Docker images that can be used for building in non-Linux hosts. CROPS itself also has this nice Mac guide that almost works.
Well, the manual works for the older amd64 MacBooks because the pre-built Docker images are only available for amd64 architecture. Since Apple Silicon is arm64, Docker gives a nice warning that the image may or may not work, and here’s a spoiler alert, it does not. Attempting to run bitbake after following the guide gives the following error:
OSError: Cannot initialize new instance of inotify, Errno=Function not implemented (ENOSYS)However, I recommend keeping that CROPS guide nearby because we are going to follow it once we get the suitable Docker images built. The first step of the journey is pulling the Docker image source repositories for the two images mentioned in the CROPS Mac guide:
% git clone https://github.com/crops/samba.git
% git clone https://github.com/crops/poky-container.git
The first one is responsible for creating a Samba file server that provides the contents of the build container to the Mac file system via a Docker volume. The second one is the actual builder image. Building the Samba image is simple enough:
% cd samba
% docker build . -t crops/samba:selfbuilt
% cd ..
The poky-container image is a bit trickier. It requires an intermediate operating system image provided by CROPS as its base layer. However, these images are only available for amd64 architecture. Therefore, we need to find something else that’s more suitable for us and arm64.
Docker Hub is a site containing Docker images for a variety of uses. Among many others, it also contains the CROPS amd64 images that we cannot use. By searching for “Yocto”, and limiting the results to arm64 architecture we can find few results. However, none of these (at least at the time of writing) fit into the CROPS workflow or are up to date, meaning that they won’t work with the newer versions of Yocto. Therefore we need to build the intermediate operating system image by ourselves.
The Dockerfiles used to build the operating system images are open source. These Dockerfiles basically fetch an operating system image as a base and perform some actions on them to make them ready for building Yocto. Unfortunately, the scripts that create the images use GNU versions of some commands, meaning that the scripts won’t work with the BSD commands Mac has. But fear not, I made a fork for building the intermediate OS images on Mac! It works at least for the Ubuntu 22.04 image, I was a bit lazy and didn’t check the dozen other options. To build the Ubuntu base OS image, run the following commands:
git clone git@github.com:ejaaskel/yocto-dockerfiles.git
cd yocto-dockerfiles
export REPO=ejaaskel/yocto
export DISTRO_TO_BUILD=ubuntu-22.04
./build_container.sh
cd ..
This will create two images: ejaaskel/yocto:ubuntu-22.04-base and ejaaskel/yocto:ubuntu-22.04-builder. Now we can go to the CROPS poky-container Dockerfile and replace their base image with the one we just built. After that, we should be able to build the poky-container as an arm64 image and get to building Yocto.
% cd poky-container
## Open your favourite text editor (it better be nvim),
## and replace these lines in Dockerfile:
ARG BASE_DISTRO=SPECIFY_ME
FROM crops/yocto:$BASE_DISTRO-base
## With these lines to specify the distro version and
## use the Docker image we built:
ARG BASE_DISTRO=ubuntu-22.04
FROM ejaaskel/yocto:$BASE_DISTRO-base
% docker build . -t crops/poky:selfbuilt
% cd ..
Now we’re again back on track to follow that CROPS guide. We just have to suffix every mention of the CROPS images with :selfbuilt so that we’ll use the built images instead of pulling images from Docker Hub. So whenever there’s a mention of crops/samba in the guide, write crops/samba:selfbuilt, and when there’s a mention of crops/poky, use crops/poky:selfbuilt instead.
Building Yocto
If you followed the instructions in the CROPS guide you should end up with an Ubuntu terminal in /workdir and a Finder window that’s connected to the same location in the Docker container. After that, it’s just a matter of following Yocto’s Quick Build manual or building something else that’s interesting. Once the build finishes, you can access the files in Finder as you normally do, or if you prefer to use the command line, docker cp should do the trick as well:
# Use docker ps to get crops/poky:selfbuilt container id
% docker ps
% docker cp <container-id>:workdir/<whatever-you-want-to-copy> .
By the way, if you stick to docker cp for moving stuff around, you don’t actually need to start the samba container. Saves a bit of effort.
If you happen to need a root shell in the container for some reason, like installing packages, you can open it like this:
# Use docker ps to get crops/poky:selfbuilt container id
% docker ps
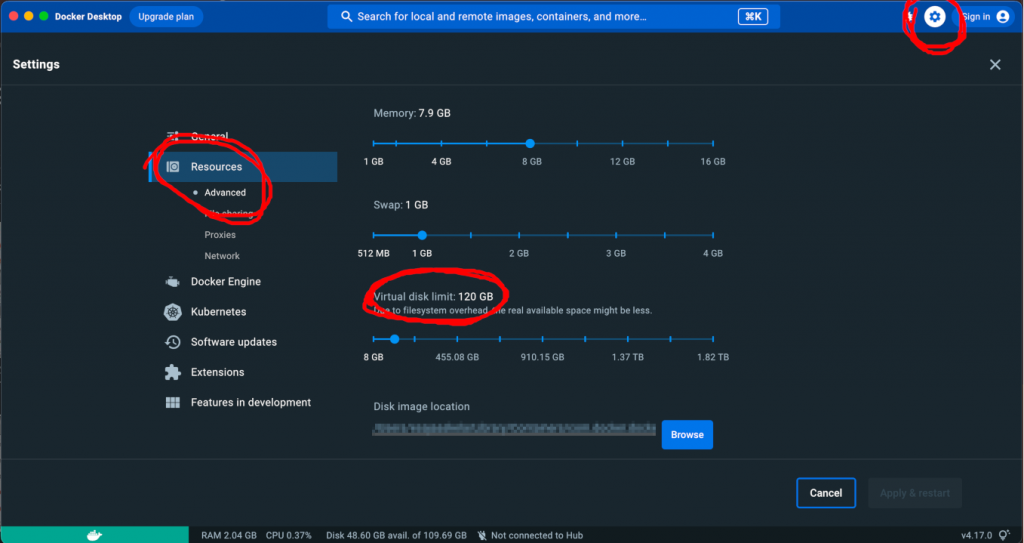
% docker exec -it --user=root <container-id> bashIf (and when) you run out of disk space, you can increase the virtual disk size from the Docker Desktop program. Select the cog from the upper right corner to enter settings, navigate to Resources->Advanced and from there you can increase the virtual disk limit. I’m quite sure there is a way to do this in the command line as well, but hopefully this isn’t a task that I’ll have to do so often that I’d need to figure it out.
If you on the other hand see weird or unexpected build failures, or out-of-memory errors, you can try cranking up the memory slider. 8 gigabytes is a good start, but more may be required. Lowering the values of BB_NUMBER_THREADS and PARALLEL_MAKE is also a good idea if there are not enough resources for the build.
That’s all for this time! Hopefully, this helped you to get started with Yocto builds on Apple Silicon a bit quicker. Fortunately, this wasn’t really anything groundbreaking, mostly it was just a matter of combining a few different information sources and a bit of script editing. The biggest sidestep from the CROPS instructions was building the Docker images instead of using the ready-built ones. But for someone new to Mac & Docker, it may take a surprisingly long time to figure this out. At least it did for me. Writing this also helped a bit with my buyer’s remorse. Until next time!


On behalf of my engineering team, thanks for creating this. Your fork allowed us to configure Yocto on new M2 Pro-based MacBooks in no time.
That’s great, it’s always nice to hear that these projects have been helpful to someone!
Thank you very much ! .. Helped me get going on the arm based MAC within couple of hours.